Monday, January 21, 2019

Modify an Array Stored in an Object

Basic Data Structures: Modify an Array Stored in an Object
Now you've seen all the basic operations for JavaScript objects. You can add, modify, and remove key-value pairs, check if keys exist, and iterate over all the keys in an object. As you continue learning JavaScript you will see even more versatile applications of objects. Additionally, the optional Advanced Data Structures lessons later in the curriculum also cover the ES6 Map and Set objects, both of which are similar to ordinary objects but provide some additional features. Now that you've learned the basics of arrays and objects, you're fully prepared to begin tackling more complex problems using JavaScript!


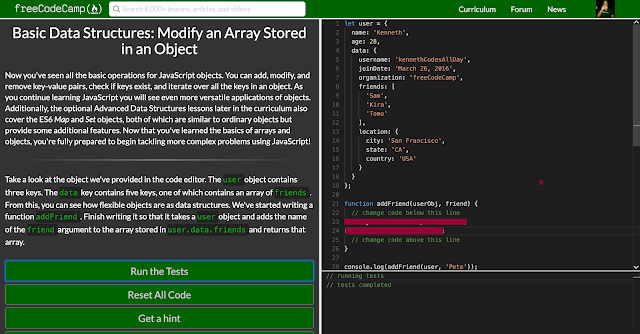
Take a look at the object we've provided in the code editor. The user object contains three keys. The data key contains five keys, one of which contains an array of friends. From this, you can see how flexible objects are as data structures. We've started writing a function addFriend. Finish writing it so that it takes a user object and adds the name of the friend argument to the array stored in user.data.friends and returns that array.

Sunday, January 13, 2019

Modify an Object Nested Within an Object

Basic Data Structures: Modify an Object Nested Within an Object
Now let's take a look at a slightly more complex object. Object properties can be nested to an arbitrary depth, and their values can be any type of data supported by JavaScript, including arrays and even other objects. Consider the following:

let nestedObject = {
  id: 28802695164,
  date: 'December 31, 2016',
  data: {
    totalUsers: 99,
    online: 80,
    onlineStatus: {
      active: 67,
      away: 13
    }
  }
};
nestedObject has three unique keys: id, whose value is a number, date whose value is a string, and data, whose value is an object which has yet another object nested within it. While structures can quickly become complex, we can still use the same notations to access the information we need.


Here we've defined an object, userActivity, which includes another object nested within it. You can modify properties on this nested object in the same way you modified properties in the last challenge. Set the value of the online key to 45.

Friday, January 11, 2019

Basic Data Structures: Add Key-Value Pairs to JavaScript Objects

Basic Data Structures: Add Key-Value Pairs to JavaScript Objects
At their most basic, objects are just collections of key-value pairs, or in other words, pieces of data mapped to unique identifiers that we call properties or keys. Let's take a look at a very simple example:

let FCC_User = {
  username: 'awesome_coder',
  followers: 572,
  points: 1741,
  completedProjects: 15
};
The above code defines an object called FCC_User that has four properties, each of which map to a specific value. If we wanted to know the number of followers FCC_User has, we can access that property by writing:

let userData = FCC_User.followers;
// userData equals 572
This is called dot notation. Alternatively, we can also access the property with brackets, like so:

let userData = FCC_User['followers']
// userData equals 572
Notice that with bracket notation, we enclosed followers in quotes. This is because the brackets actually allow us to pass a variable in to be evaluated as a property name (hint: keep this in mind for later!). Had we passed followers in without the quotes, the JavaScript engine would have attempted to evaluate it as a variable, and a ReferenceError: followers is not defined would have been thrown.


Using the same syntax, we can also add new key-value pairs to objects. We've created a foods object with three entries. Add three more entries: bananas with a value of 13, grapes with a value of 35, and strawberries with a value of 27.

Saturday, January 5, 2019

Basic Data Structures: Iterate Through All an Array's Items Using For Loops

Basic Data Structures: Iterate Through All an Array's Items Using For Loops
Sometimes when working with arrays, it is very handy to be able to iterate through each item to find one or more elements that we might need, or to manipulate an array based on which data items meet a certain set of criteria. JavaScript offers several built in methods that each iterate over arrays in slightly different ways to achieve different results (such as every(), forEach(), map(), etc.), however the technique which is most flexible and offers us the greatest amount of control is a simple for loop.

Consider the following:

function greaterThanTen(arr) {
  let newArr = [];
  for (let i = 0; i < arr.length; i++) {
    if (arr[i] > 10) {
      newArr.push(arr[i]);
    }
  }
  return newArr;
}

greaterThanTen([2, 12, 8, 14, 80, 0, 1]);
// returns [12, 14, 80]
Using a for loop, this function iterates through and accesses each element of the array, and subjects it to a simple test that we have created. In this way, we have easily and programmatically determined which data items are greater than 10, and returned a new array containing those items.


We have defined a function, filteredArray, which takes arr, a nested array, and elem as arguments, and returns a new array. elem represents an element that may or may not be present on one or more of the arrays nested within arr. Modify the function, using a for loop, to return a filtered version of the passed array such that any array nested within arr containing elem has been removed.

Monday, December 31, 2018

Basic Data Structures: Check For The Presence of an Element With indexOf()

Days: 45-47

Since arrays can be changed, or mutated, at any time, there's no guarantee about where a particular piece of data will be on a given array, or if that element even still exists. Luckily, JavaScript provides us with another built-in method, indexOf(), that allows us to quickly and easily check for the presence of an element on an array. indexOf() takes an element as a parameter, and when called, it returns the position, or index, of that element, or -1 if the element does not exist on the array.

For example:

let fruits = ['apples', 'pears', 'oranges', 'peaches', 'pears'];

fruits.indexOf('dates') // returns -1
fruits.indexOf('oranges') // returns 2
fruits.indexOf('pears') // returns 1, the first index at which the element exists

indexOf() can be incredibly useful for quickly checking for the presence of an element on an array. We have defined a function, quickCheck, that takes an array and an element as arguments. Modify the function using indexOf() so that it returns true if the passed element exists on the array, and false if it does not.

Friday, December 28, 2018

Combine Arrays with the Spread Operator


Another huge advantage of the spread operator, is the ability to combine arrays, or to insert all the elements of one array into another, at any index. With more traditional syntaxes, we can concatenate arrays, but this only allows us to combine arrays at the end of one, and at the start of another. Spread syntax makes the following operation extremely simple:

let thisArray = ['sage', 'rosemary', 'parsley', 'thyme'];

let thatArray = ['basil', 'cilantro', ...thisArray, 'coriander'];
// thatArray now equals ['basil', 'cilantro', 'sage', 'rosemary', 'parsley', 'thyme', 'coriander']
Using spread syntax, we have just achieved an operation that would have been more complex and more verbose had we used traditional methods.


We have defined a function spreadOut that returns the variable sentence, modify the function using the spread operator so that it returns the array ['learning', 'to', 'code', 'is', 'fun'].

Thursday, December 27, 2018

Copy an Array with the Spread Operator

Basic Data Structures: Copy an Array with the Spread Operator
While slice() allows us to be selective about what elements of an array to copy, among several other useful tasks, ES6's new spread operator allows us to easily copy all of an array's elements, in order, with a simple and highly readable syntax. The spread syntax simply looks like this: ...

In practice, we can use the spread operator to copy an array like so:

let thisArray = [true, true, undefined, false, null];
let thatArray = [...thisArray];
// thatArray equals [true, true, undefined, false, null]
// thisArray remains unchanged, and is identical to thatArray

We have defined a function, copyMachine which takes arr (an array) and num (a number) as arguments. The function is supposed to return a new array made up of num copies of arr. We have done most of the work for you, but it doesn't work quite right yet. Modify the function using spread syntax so that it works correctly (hint: another method we have already covered might come in handy here!).

Wednesday, December 26, 2018

Add Items Using splice()


Remember in the last challenge we mentioned that splice() can take up to three parameters? Well, we can go one step further with splice() — in addition to removing elements, we can use that third parameter, which represents one or more elements, to add them as well. This can be incredibly useful for quickly switching out an element, or a set of elements, for another. For instance, let's say you're storing a color scheme for a set of DOM elements in an array, and want to dynamically change a color based on some action:

function colorChange(arr, index, newColor) {
  arr.splice(index, 1, newColor);
  return arr;
}

let colorScheme = ['#878787', '#a08794', '#bb7e8c', '#c9b6be', '#d1becf'];

colorScheme = colorChange(colorScheme, 2, '#332327');
// we have removed '#bb7e8c' and added '#332327' in its place
// colorScheme now equals ['#878787', '#a08794', '#332327', '#c9b6be', '#d1becf']
This function takes an array of hex values, an index at which to remove an element, and the new color to replace the removed element with. The return value is an array containing a newly modified color scheme! While this example is a bit oversimplified, we can see the value that utilizing splice() to its maximum potential can have.


We have defined a function, htmlColorNames, which takes an array of HTML colors as an argument. Modify the function using splice() to remove the first two elements of the array and add 'DarkSalmon' and 'BlanchedAlmond' in their respective places.

Sunday, December 23, 2018

Remove Items Using splice()

Ok, so we've learned how to remove elements from the beginning and end of arrays using shift() and pop(), but what if we want to remove an element from somewhere in the middle? Or remove more than one element at once? Well, that's where splice() comes in. splice() allows us to do just that: remove any number of consecutive elements from anywhere in an array.

splice() can take up to 3 parameters, but for now, we'll focus on just the first 2. The first two parameters of splice() are integers which represent indexes, or positions, of the array that splice() is being called upon. And remember, arrays are zero-indexed, so to indicate the first element of an array, we would use 0. splice()'s first parameter represents the index on the array from which to begin removing elements, while the second parameter indicates the number of elements to delete. For example:

let array = ['today', 'was', 'not', 'so', 'great'];

array.splice(2, 2);
// remove 2 elements beginning with the 3rd element
// array now equals ['today', 'was', 'great']
splice() not only modifies the array it's being called on, but it also returns a new array containing the value of the removed elements:

let array = ['I', 'am', 'feeling', 'really', 'happy'];

let newArray = array.splice(3, 2);
// newArray equals ['really', 'happy']

We've defined a function, sumOfTen, which takes an array as an argument and returns the sum of that array's elements. Modify the function, using splice(), so that it returns a value of 10.

Saturday, December 22, 2018

Remove Items from an Array with pop() and shift()

Both push() and unshift() have corresponding methods that are nearly functional opposites: pop() and shift(). As you may have guessed by now, instead of adding, pop() removes an element from the end of an array, while shift() removes an element from the beginning. The key difference between pop() and shift() and their cousins push() and unshift(), is that neither method takes parameters, and each only allows an array to be modified by a single element at a time.

Let's take a look:

let greetings = ['whats up?', 'hello', 'see ya!'];

greetings.pop();
// now equals ['whats up?', 'hello']

greetings.shift();
// now equals ['hello']
We can also return the value of the removed element with either method like this:

let popped = greetings.pop();
// returns 'hello'
// greetings now equals []

We have defined a function, popShift, which takes an array as an argument and returns a new array. Modify the function, using pop() and shift(), to remove the first and last elements of the argument array, and assign the removed elements to their corresponding variables, so that the returned array contains their values.

Monday, December 17, 2018

Basic Data Structures: Access an Array's Contents Using Bracket Notation

Basic Data Structures: Access an Array's Contents Using Bracket Notation
The fundamental feature of any data structure is, of course, the ability to not only store data, but to be able to retrieve that data on command. So, now that we've learned how to create an array, let's begin to think about how we can access that array's information.

When we define a simple array as seen below, there are 3 items in it:

let ourArray = ["a", "b", "c"];
In an array, each array item has an index. This index doubles as the position of that item in the array, and how you reference it. However, it is important to note, that JavaScript arrays are zero-indexed, meaning that the first element of an array is actually at the zeroth position, not the first.

In order to retrieve an element from an array we can enclose an index in brackets and append it to the end of an array, or more commonly, to a variable which references an array object. This is known as bracket notation.

For example, if we want to retrieve the "a" from ourArray and assign it to a variable, we can do so with the following code:

let ourVariable = ourArray[0];
// ourVariable equals "a"
In addition to accessing the value associated with an index, you can also set an index to a value using the same notation:

ourArray[1] = "not b anymore";
// ourArray now equals ["a", "not b anymore", "c"];
Using bracket notation, we have now reset the item at index 1 from "b", to "not b anymore".


In order to complete this challenge, set the 2nd position (index 1) of myArray to anything you want, besides "b".

Friday, December 14, 2018

Prevent Infinite Loops with a Valid Terminal Condition

Debugging: Prevent Infinite Loops with a Valid Terminal Condition

The final topic is the dreaded infinite loop. Loops are great tools when you need your program to run a code block a certain number of times or until a condition is met, but they need a terminal condition that ends the looping. Infinite loops are likely to freeze or crash the browser, and cause general program execution mayhem, which no one wants.

There was an example of an infinite loop in the introduction to this section - it had no terminal condition to break out of the while loop inside loopy(). Do NOT call this function!

function loopy() {
  while(true) {
    console.log("Hello, world!");
  }
}
It's the programmer's job to ensure that the terminal condition, which tells the program when to break out of the loop code, is eventually reached. One error is incrementing or decrementing a counter variable in the wrong direction from the terminal condition. Another one is accidentally resetting a counter or index variable within the loop code, instead of incrementing or decrementing it.


The myFunc() function contains an infinite loop because the terminal condition i != 4 will never evaluate to false (and break the looping) - i will increment by 2 each pass, and jump right over 4 since i is odd to start. Fix the comparison operator in the terminal condition so the loop only runs for i less than or equal to 4.

Tuesday, December 11, 2018

Catch Off By One Errors When Using Indexing

Debugging: Catch Off By One Errors When Using Indexing
Off by one errors (sometimes called OBOE) crop up when you're trying to target a specific index of a string or array (to slice or access a segment), or when looping over the indices of them. JavaScript indexing starts at zero, not one, which means the last index is always one less than the length of the item. If you try to access an index equal to the length, the program may throw an "index out of range" reference error or print undefined.

When you use string or array methods that take index ranges as arguments, it helps to read the documentation and understand if they are inclusive (the item at the given index is part of what's returned) or not. Here are some examples of off by one errors:

let alphabet = "abcdefghijklmnopqrstuvwxyz";
let len = alphabet.length;
for (let i = 0; i <= len; i++) {
  // loops one too many times at the end
  console.log(alphabet[i]);
}
for (let j = 1; j < len; j++) {
  // loops one too few times and misses the first character at index 0
  console.log(alphabet[j]);
}
for (let k = 0; k < len; k++) {
  // Goldilocks approves - this is just right
  console.log(alphabet[k]);
}

Fix the two indexing errors in the following function so all the numbers 1 through 5 are printed to the console.